Archive | Technology RSS feed for this section

A Better Android DatePicker Plug-in for Cordova

14 Apr

Cordova (previously PhoneGap) needs no introduction. It’s the best solution to deploy websites developed using HTML, CSS and Javascript as a native app over wide range of mobile devices. Certainly mobile app built using web technologies has it’s own share of advantages and disadvantages, but this is not up for discussion in this post.

I’ve searched quite a few times in past for a way to invoke native DatePicker on Android using Cordova or any of it’s plug-in. Finally, I found one over official PhoneGap Plugins page. For starter, it serves the need as it pops the DatePicker and allows developers to capture the date selected using DatePicker in Javascript.

But as I started using it, there’re following few features I found missing in this plugin, especially in case of newer Android OSes (> 4.0) –

  1. You cannot set Minimum and/or Maximum Date in DatePicker. So, if there’s specific need to have date range, this plugin certainly fails to provide proper solution. It happens on all Android OSes.
  2. On Android OS > 4.0, the DatePicker loses Cancel button. I checked and this issue is with Android ICS itself, but it would be nice to have that button just in case user don’t want to enter anything once DatePicker is popped open.
  3. Also on Android OS > 4.0, user is no really required to press done to set date. Any action performed like clicking hardware back, or clicking outside the DatePicker pop-up, results in selection of date. Again this is default feature to ICS versions but definitely it’s a bad User Experience.


I searched over various StackOverflow threads but none of them were able to solve these issues completely, though in parts some of the issues were solved. So, I decided to create my own plugin. Of course, I’ve taken the existing plugin and created my own. You can find revised plugin at my GitHub page.

I tried to address all the issues I listed above. Using this plugin is quite easy, just like any other Cordova plugins. Just follow the instructions in the readme.md file in the project or go through the following steps –

Step 1: Copy and Reference –

Just copy datePickerPlugin.js file to your ‘www’ folder. Create a package com.bikasv.plugins.datepicker and put DatePickerPlugin.java file into this package. Now update your res/xml/config.xml with following lines –

<plugin name="DatePickerPlugin" value="com.bikasv.plugins.datepicker.DatePickerPlugin"/>
 

Step 2: Invoke –

Call following function if you need DatePicker –

    function handleDates(elm, options) {
        event.stopPropagation();
        var currentField = $(elm);
        var opts = options || {};
        var minVal = opts.min || 0;
        var maxVal = opts.max || 0;

        var myNewDate = Date.parse(currentField.val()) || new Date();
        if(typeof myNewDate === "number") {
            myNewDate = new Date (myNewDate);
        }

        window.plugins.datePicker.show({
            date : myNewDate,
            mode : 'date',
            minDate: Date.parse(minVal),
            maxDate: Date.parse(maxVal)
        }, function(returnDate) {
            if(returnDate !== "") {
                var newDate = new Date(returnDate);
                currentField.val(getFormattedDate(newDate));
            }
            currentField.blur();
        });
    }

And following for TimePicker –

    function handleTime(elm) {
        var currentField = $(elm);
        var time = currentField.val();
        var myNewTime = new Date();

        if(time) {
            myNewTime.setHours(time.substr(0, 2));
            myNewTime.setMinutes(time.substr(3, 2));
        }
        plugins.datePicker.show({
            date : myNewTime,
            mode : 'time'
        }, function(returnDate) {
            if(returnDate !== "") {
                var newDate = new Date(returnDate);
                currentField.val(getFormattedTime(newDate));
            }

            currentField.blur();
        });
    }

Step 3: Done –
Now you can see the result. A DatePicker with ability to set Minimum and Maximum date. See following screenshots as it appears on Android 4.0+ devices:
With Max Date With Min Date Time Picker
 

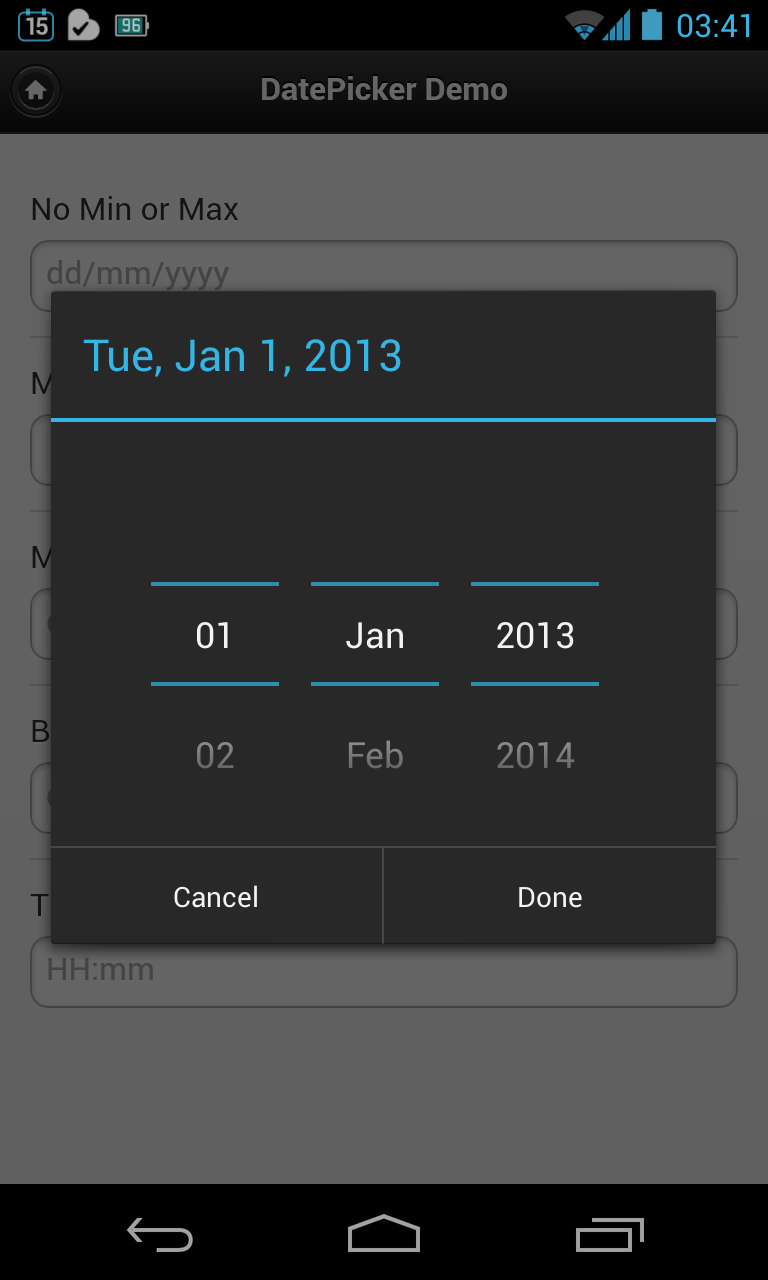
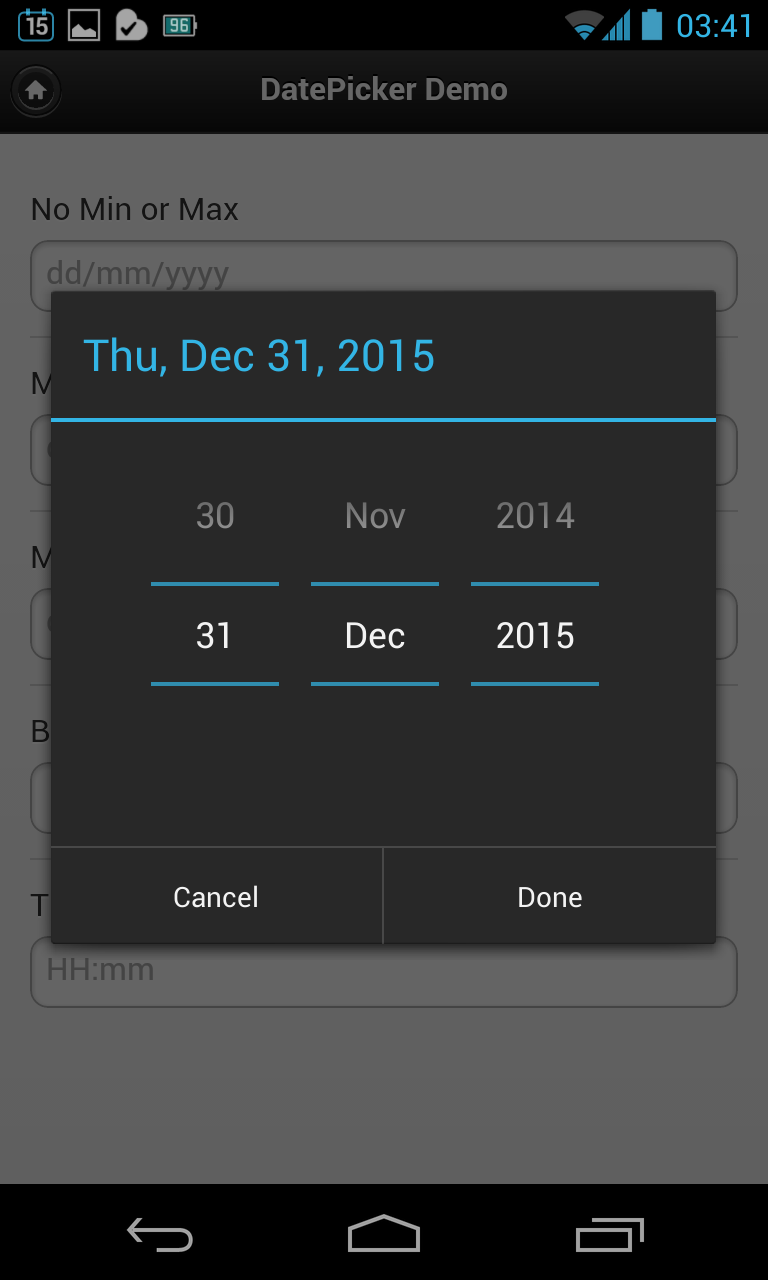
This plugin solves all three issues I’ve mentioned.

  1. You can set Minimum and Maximum date on DatePicker, and this works on all Android OSes.
  2. Cancel button is now present in DatePicker – something which is improvement over stock DatePicker.
  3. Clicking outside the DatePicker will do nothing, neither closes the pop-up nor update the date. Hardware Back button will not update the date as well. Again this is UX improvement over stock DatePicker.

Found any bugs or have any suggestions? Create an issue over GitHub issues page.

Project Link …

Take control of your Android – Tasker!

2 Aug

With my growing love towards great open world of Android and it’s being hard to cover them in one, I decided to start a blog series – Take control of Android. This series will primarily deal with the various tools and methods that helps to automate practically any task on Android. Also, there will be some tools discussed that will add ease of use and remote access to Android. Even if you happen to know a few things, I surely hope you’ll learn something new in this series.

Today, the app in discussion is Tasker – arguably best task automation tool available on Android platform. Tasker is not free though, and you’ve to shell out Rs. 346.94 to get your hands on it. But I must say, it’s totally worth it’s price and you won’t regret buying it.

Once downloaded and installed, you can create Profiles which contains Tasks to be automated. One example is shown below –

Now, although Tasker is automating tool and is supposed to do repeated task with ease, the app itself is not that easy to use. There is small, not much I assure you, learning curve associated with this app. So, let me walk you through Tasker by creating one simple automated task.

For our purpose, let’s create a task to send SMS when we create Missed Call from our Favorite contact. Remember, this task will only send the SMS when a call is missed by the person who is in your favorite contact list. For everyone else, no action will be performed. So, let’s get started.

Click + on Profiles menu and give it some name. A new window will pop up asking to select First Context. First context is the condition which will be satisfied to execute the task. In our case this is a missed call from favorite contact.

Now select State in the menu and then select Phone and finally Missed Call.

Now select favorite contacts, either by typing C:FAV or by using search icon above the text box. Click check mark, and you’ll be presented with Tasks screen.

Now click new task, and in next screen click + icon. You’ll now be presented with Action categories.

Choose Phone option here and scroll to bottom to select Send Sms option. Now type in the number of contact to whom SMS is to be sent, and the message and click the check mark. You’ll see the new Task created. Now click the check mark of this screen to have your profile configured.

Now, whenever you receive a missed call, the phone will automatically send the predefined text to the given contact.

You can add multiple tasks to the profile as well. Also, you can further customize the task by having Exit Task (task which will be performed once the main task is performed), moving the existing task to Exit Task, Change Task or Unlink Task. Just long press the task menu and you’ll get these options.

One of the coolest features of Tasker is the ability to export task in various formats, but the most promising being able to export them as an app. Just long press any of the task and select Export. Now select As App in next screen.

For app creation Tasker App Factory is required. If you haven’t installed it already, Tasker prompts you to install it. Also, the task must have an icon for this process to complete.

Once prerequisite is met, the export process will be started. Once the process finishes, the app will be ready and an icon will be shown, which on click, installs the new app.

This was just one example to simplify your life by automating the task, Taskers have many such arsenals under it’s belt. For example, for me, it automatically turns on the WiFi and disables the mobile internet when I reach home or the office. For rest of the places, it does the opposite.

Although, Tasker is very handy, very powerful and very versatile app, there’s a few gripes while using the app. I’d like you to know it before you spend your hard earned money on this app –

  • Tasker doesn’t catch the location with ease. So, the location based tasks may fail sometimes.
  • There are too many screens involved in creating single profile.
  • Corollary to above, developers might have provided with pre-defined profiles, those which are very commonly used.
  • Help should be bundled with the app rather than being online. Demo examples would be great.
  • Has a learning curve that can fend away novice users.

There are areas where Tasker shines compared to other automation apps (their review will come soon) –

  • Unlike some, Tasker is completely offline utility and doesn’t require external server to host tasks.
  • Already feature-rich Tasker, can further be enhanced with the help of plugins, which is abundant.
  • Memory usage of Tasker is quite less and doesn’t drain the battery much.

It’s clear that Tasker is quite powerful utility and it’s stated flaw is not as much as it’s benefits. But if you still want to have review of other similar tools before buying Tasker, I suggest you to check this blog in a while. I’ll covering a lot of automation tools.

Outlook web mail is here!

1 Aug

Finally, Microsoft has decided to go for more aptly named Outlook.com for it’s web mail service. It’s quite fitting and more professional naming compared to older Hotmail or Live Mail.

For those of you who wonders if someone really uses any other web mail other than the giant GMail, I must say it’s personal preference. For me, Outlook web mail (or Live Mail, or Hotmail. Huh!) is always very fluid, distraction free, and very integrated service. All the online features can be accessed from single ecosystem (I’ll come to that later), quite unlike GMail. There’s hell lot of space thrown, at least for previous users, and you can use them the way you want – for mails, or for any other files. Social integration is unparalleled too. But at the end of the day, it’s personal choice that matters.

With the new Outlook Web Mail, Microsoft has really stirred the web mail market with new freshness. The new Metro styled UI and loads of features really worth a good look for everyone. Let me walk you through Outlook.com with screenshots –

The Outlook.com opens with Metro style and at the same time minimalistic view, the way email should be.

Welcome Screen

Switching to other features is easy. Just press the drop down next to Outlook logo (appears on hover) and see the option to go to desired place. Visual and easy!

Following is the Skydrive and Calendar views, not much have changed here –

Contacts has been updated to new Metro style. Viewing, adding or editing contact is plain simple. You can also connect to various social networks to enrich your contacts and have them in one single place.

Composing mails is easy and it’s one of the prettiest screen I’ve ever seen in any mail service or client :). Since the contacts are socially connected, contact’s image is fetched when you search for them. This one screen has me sold!

On main screen, if you click the message icon, you can connect to Messenger. Instant messenger appears on the right hand side and is quite easy to use.

You can also choose where to reading pane – Off, Right, or Bottom.

Further mail settings can be customized using setting icon, next to messenger icon.

Finally, on top-rightmost position is your account and profile settings. Clicking it, reveals the profile picture, linked accounts, log out options and links to account setting.


Now, something better to know. You can create alias for your existing email – this way you can avoid @hotmail or @live email addresses in lieu of @outlook. Fun right? Just head over to Alias Change option, and input your desired alias. You’ll then receive confirmation mail telling your alias is created, and you’ll be having brand new email address!

Finally, one last thing – Although most of the mail actions are given in top ribbon, there’re few more of them. In order to access them, just click Actions, on top-right of the mail. It’ll pop open the menu like below to give you further actions to perform.

Root any Android phone without hassle!

13 Jan

Android is really a fun mobile OS providing you the ability to customize it the way you like, or to install as many  app you want. But if you really want to take full advantage of the OS, you need to root the device. For those who don’t know, rooting is the method of getting root access (Android is Linux based after all) to the OS, or in other words it’s way to have full permission to practically do anything. Rooting also enable to install the apps which require to perform system level changes/access.

Now, as we know, rooting is powerful and more fun, question comes how we do it? And also if every mobile is rootable or not?

There are several versions of Android and every version is further customized by the mobile phone manufacturer to stand out. But this adds difficulty when it comes to rooting and most of the times the phone doesn’t root at all. And, if you’re not making something (rooting, in this case) you’re actually breaking it i.e. the phone can be rendered useless if not rooted properly. So, before you try, remember your warranty will completely void and you may end up with total plastic which do nothing.

Precautions out, and if you still dare, then here comes a very handy and comfortable tool to root the Android phones – Unlock Root. This is one stop solution to root practically any device running on Android OS version 2.1 (Eclair), 2.2 (Froyo), 2.3 (Gingerbread) and 4.0.x (Ice-cream sandwich). Some notable devices (some of which are pretty nasty to root as well) are HTC Wildfire S, HTC Desire S, Samsung Nexus S, Samsung Galaxy Nexus, etc.

Interested? Just follow these very easy to use steps to root your phone and to unlock the world of possibilities.

Go here to download Unlock Root. Install this and make sure that your device drivers are also installed.

1. Open the Unlock Root application. The main window will open like this –

Main Interface

Unlock Root main interface

2. Make sure that your device must be in USB Debugging Mode. If not then just go to Settings > Applications > Development and then selection the option of USB Debugging Mode.

3. Now once you connect your device to the PC, it’ll be automatically detected by Unlock Root program and a prompt will come just like this –

Device Detection

Device Detection

4. Now you’re presented with very easy to understand two options – Root (the BIG red button) and UnRoot (the other small button). Rooting will essentially install one Superuser.apk file which will in turn grant you full permission.

Root Device

One-click rooting of the device

5. Optionally (but highly recommended by Unlock Root people), you can install Power Saver tool as well to improve the battery life. This can also be done right from the same interface.

Power Saver

Install to extend battery life

6. Finally, you’re done! Now the application will require you to reboot your device and present you with this friendly message.

Reboot

Reboot message

7. Done! Once rebooted your device will be properly unlocked. Enjoy the real freedom!

8. If, for some strange reasons, you want to unRoot your device, you can also do so with the Unlock Root application. Just connect your device and press that small little UnRoot button and you’re good to go.

How to get rid of Facebook Timeline (and bonus)?

3 Jan

If you don’t like the new Facebook Timeline and want it to removed in lieu of old Facebook Profile page, then you should know one thing – Facebook is not gonna do that, at least not anytime soon. So, can you get the old Profile page back by any means? The answer is – Yes, of course you can. Though the method is not official (in fact is complete opposite to that), it’s entirely harmless way to get the old Facebook Profile back. Read on!

Few hours back, Mashable has done the story that Facebook Timeline doesn’t work on Internet Explorer 7, citing Facebook’s recommendation of using most up-to-date version of browser. So, it’s quite simple, use Internet Explorer 7 (IE7) or less and get rid of Timeline completely, isn’t it? The situation is slightly tricky here – First, if you have Windows 7 then you cannot have IE7 installed and latest version of IE(9) is already installed. Also, older version of software means lesser support, buggy experience and most of the all vulnerability to viruses. Also, in case of Facebook, chat will not work properly.

What’s the best way then? Enter the User Agents! Before you ponder about what it is (the Wikipedia page is not very comfortable to understand), lemme tell about this in brief. User agents are like identification of browsers. Simply put, a server identifies the browser by reading it’s user agent. So if you change the user agent, server will recognize you’re using different browser altogether. Easy!

Now one final question arises? How can you change the user agent? Well, there’s an app for that (or extension to be more precise). Download user agent switchers for Chrome, Firefox or Internet Explorer. It’s simple to install and once installed you’ll get the option to switch/change the user agent of browsers (see images below for details). I recommend using user agent of Internet Explorer 6 to be certain that Timeline doesn’t come up at all.

Chrome ua

Change user agent in Chrome

FF ua

Change user agent in Firefox

IE ua

Change user agent in Internet Explorer.

There are other benefits of using IE6 user agent as well – the news ticker will be gone and the chat will cover entire right part of window when opened, much like good old Facebook. once you set the user agent, just refresh the Facebook tab and see the magic! All this and that too without any issue or security problems. But keep one thing in mind, this no-Timeline thing will only appear for you and your friend will still see the Timeline if on supported browser.

Let me know if you like the trick. Till then, Happy surfing!

Facebook Desktop Messenger is here!

30 Dec

Well, almost. Although it’s available to selected few testers currently, but if you follow this link, you can get your hands on it right away! Now, as it’s clear that you can get the messenger damn easy, one question comes to mind – why one should download yet another messenger, especially when you can use web based messenger or, better, use multi-protocol Instant messengers like Pidgin? Nice question! Let’s see if we really need this messenger.

Facebook Desktop Messenger is not just a desktop messenger but it’s also a mini Facebook in itself, sans news feed of course, which makes it unique in itself. Clearly, if you’re Facebook addict, it’s a must have peice of software for you. For others, lemme go through step by step process to help you decide –

Installation of Facebook messenger is fast and easy, but it’s a web based which somewhat makes sense and it’s sole purpose is to used to access feature that requires internet connection. There is no customization feature as well, which is disheartening for tweakers.

After installation, you need to login to Facebook using your web and once logged, you get to see this message:

First Launch

This essentially means, the only way to log out of the messenger is to log out from web. There is no separate logout for the app. Also, it doesn’t have any customization option whatsoever.

Once launched, you can see the messenger is split into 2 halves – news ticker and list of firends. Surprisingly and thankfully, the size of these windows is adjustable (this is the only customization you can do for this messenger).

Messenger Windows

You can see firend requests, notifications and messages as well. Image given below shows that:

Messenger Views

One cool feature of this messenger is that it can be docked to the right of the windows, so that can always see it even if other windows are open. And also the chat window can have multiple tabs, not the first but is really a convinience!

Docked viewChat windows

Overall, it seems a pretty robust chat software and it’s look and feel is quite impressive. As I already said, it’s a must have software for Facebook addicts, but it’s also a very handy tool to try for others, especially if you’ve some friends on Facebook.

After Gmail overhaul, it’s YouTube’s turn!

21 Nov

It seems Google has decided to overhaul the User Interface of it’s entire services. Few months back we’ve seen the redesign of Google’s homepage, then few weeks back we’ve seen complete redesign of Gmail, and now it seems that YouTube‘s next.

But for YouTube, it’s not that easy. Right now, Google’s is just testing the new layout and it’s not yet available even in TestTube. But fret not, the method to enable new UI is pretty straight-forward and easily revertible too. All you need is to play with the cookies, and in case you want to revert to older looks, just delete the cookie, simple!

So, how do you get the new UI? Just follow these easy steps –

  • Open your web browser and navigate to YouTube. Right now, this method seems to work only in Chrome, Firefox and Internet Explorer 9 (I’m using the Chrome for the process right now).
  • Open developer tools – Press F12 in IE9, Ctrl+shift+j in Chrome and Ctrl+shift+k in Firefox for quickly open the developer tools.
  • Now navigate to console part and enter the following code:

document.cookie=”VISITOR_INFO1_LIVE=ST1Ti53r4fU”;

Developer Console

Clear your console before proceeding, if you wish.

Developer console input

Just input the code shown and you're done.

  • Done! Just close the developer tools and refresh the YouTube page and you’ll land into new refreshed page.

After the refresh, you’ll see a simple guide to the changes done. If you like follow these to learn or simply take a look at the images below. Also to note, these changes goes pretty well with CosmicPanda, released by YouTube some time back and I strongly recommend to use this as well to have an immersive experience.

(click images to enlarge)

YouTube - 1

YouTube - 2

YouTube - 3

YouTube - 4

YouTube - 5

Now see what you want to, on Facebook.

18 Nov

Few time back, Facebook started experimenting with it’s news stream. As a result, Highlighted stories born, a seemingly novel idea to put news most important to user at the top, though the end result was nothing like expected. Most of the times, some stupid posts cover up your news stream and you completely loose the track of very recent stories. It seems if 4 or 5 of your friends have posted about a link, it is considered highlighted for you and kept above the news posted on your wall a second ago. This is pretty annoying, isn’t it?

I’ve seen quite a few users moving away from Facebook or at least shouting out loud in different forums/websites/blogs because of these changes and even I’s quite frustrated too. I mean, who’s Facebook to decide which story I want to read, most importantly when it fails every time in guessing that? Marking those stories as not a featured/highlighted post wouldn’t help either.

Till now, I was using some chrome extension to get only the recent stories but it seems that Facebook has finally heard our request.Actually, it heard few time back already, but the change was gradual and not all users got the control over the news feed (I got this feature today itself). With this change, now user can select if they want to see Highlighted news (current news style system) or the Recent news (the loved old style). No matter what type of news feed you choose, the pesky real-time news update will be there. So there’s no getting away from that, at least officially.

As this new feature is easy to miss, here is step-by-step procedure to control your news feed –

1. Just look for the Sort option in the top of the news.

2. Click on the Sort button and you’ll see two options – Highlighted Stories First (in bold) and Recent Stories First.

3. Select the news style you’re comfortable with and you’re done. If you prefer new Highlight style, only Sort will be written, else Sort: Recent Stories First will come.

New Gmail is live now!

2 Nov

Hi,

The new and more robust Gmail (discussed earlier) is finally live for everyone. What could be the better day to choose its official launch than on my birthday (Or maybe I’m thinking too much 🙂 )!! Although it seems to be open for everyone right now, but chances are that you may not see the option to switch to this new interface, as Google is not making it default for now. But knowing the fact that it’ll be default interface in future, I think it’s better to switch early and get accustomed with.

Just follow these steps to get the new interface for the Gmail:

1. Look in the bottom right corner of you Gmail, and you’ll find the option to switch to new look.

Gmail Switch

2. Now, you’ll see a popup asking you to switch to new interface or continue to old one. Just press switch and you’re done.

Switch option

3. Now as you’ve switched to new interface, you’ll be greeted with te change-log and an introductory video. just go through the links if you wish to know more, else click Continue to the new look.

Welcome message

Great! Now as you’ve new interface, just start fiddling with it and customize it to suit your taste. You can also read (really?) the official Gmail announcement here.

TapSense – Intelligence to the touch!

31 Oct

I’ve covered about various methods of interacting with the system earlier, but what if you want to see improvement in the existing methods of interaction? That’s where TapSense comes into play. It’s essentially a technology that can enhance the interaction of finger with the touchscreen.

TapSense, developed by Chris Harrison of Carnegie Mellon University, essentially facilitate touchscreens to differentiate between the touch input, i.e. it can make a difference between normal human finger and stylus. And that too with 99% accuracy!

Although interesting, this is not that exiting part. The more fun part is, TapSense can also differentiate between various parts of fingers! With 95% of accuracy it can detect what part of the finger has touched the screen. The defined four parts which it can detect are – Tip, Nail, Pad, & Knuckle.

Apart from the touchscreen, TapSense requires a microphone to operate. Combined with touchscreen, TapSense detects the input that has touched it. As it uses sound as input, it’s also able to distinguish between the users who holds the pen type input, just by the applied pressure. Seemingly, simple and not so great innovation at first, this actually opens up a huge possibility to the way interact with the system. Now, one can have apps that can perform different set of actions based on the surface touched the screen. Now you may get the idea.

Though pretty much in it’s proof-of-concept phase, it surely has huge potential and maybe a newer opportunity for application developers to create immersive applications.

Just look at the video showing it’s ability, and get overwhelmed.


You can read the detailed paper from here.